
There are so many things you could do with a trading robot in the forex market. The most common use is the automation of trading strategies. In this article, we will examine the basics of programming a forex trading robot. We’ll start by answering the question, “What types of codes can be programmed in the MQL4/MQL5 programming language?”
What Types of Code Can Be Programmed on the MQL4/MQL5 Programming Language?
The illustrations to be discussed here are based on the MQL4/MQL5 programming language. Three types of code can be written in the MQL4/MQL5. These are:
- Expert advisors (forex robots)
- Custom indicators
- Scripts
1. The expert advisor (EA)
This represents the automation of a manual trading system that is attached to the chart of a chosen financial asset. In other words, any code written for an EA has to be done with the chart of the asset in mind.
Some of these events run once, while others run multiple times until they are signaled to stop. So, an EA will start to operate if the events that make up the initialization (init) code sequence are activated.
These events include a new price level/tick, an event on the charts, or customized events. Once these events kick in, the EA will send an order to the broker’s server to either open a trade or close it. EA files are stored in the MQL4/Experts folder of the MT4 client.
2. The Script
This is a code used to perform a one-time execution of some functions, such as the Start event. Script files are stored in the MQL4/scripts folder of the MT4 client.
3. The Custom indicator
This is a bespoke technical indicator not listed among the native indicators on the MT4. They are not used for trading but to identify chart-linked events that can lead to the initiation of manual or EA trade activity. The custom indicator files are stored in the MQL4/indicators folder of the MT4 client.
How To Build a Forex Robot Using MQL4/MQL5 Code
The code written for a forex trading robot, indicator, or script in the MQL4/MQL5 environment will include syntax, variables, expressions, and conditional statements. Here is a look at how to build your robot with these four:
For the rest of this piece, we’ll only be making reference to the MQL4. But whatever we say also applies to the MQL5.
1. Familiarize Yourself With the Syntax
Coding syntax is a bundle of guidelines or rules that govern the writing and structure of code within a specific programming language.
Proper compilation and execution of a Forex robot’s code depend on the programmer writing syntax that is error-free and appropriate for the coding language being used to develop the expert advisor, script, or indicator.
Here are some key components of MQL4 syntax:
- Comments: Lines of text in a program that are ignored by the compiler or interpreter. Used by programmers to explain the code, so they and others can understand it. Comments have to be enclosed in /* and */ for multi-line comments, or start with // for single-line comments.
- Variables: Named storage in computer memory that holds data. The value in a variable can change during the program execution.
- Data types: Classifications that specify what type of value a variable can hold. Examples include
int(integers),double(floating-point numbers for prices),bool(true/false),string(text),datetime(date and time), andcolor. - Identifiers: Names given to things in a program, variables, functions, classes or modules. They must start with a letter or underscore, can contain letters, digits, and underscores, and have a maximum length of 63 characters. They also cannot be MQL4 reserved words.
- Operators: These are symbols that operate on one or more operands (values or variables). They’re used for arithmetic, comparison, logical, or assignment operations. Examples include +, -, =, !=, ||, and &&.
- Conditional statements: They control the flow that executes different blocks of code based on a condition being true or false. Examples are “if”, “else if”, and “else” statements.
- Loops: They control the flow of execution, allowing a block of code to be executed as long as a condition is met. Used for iterating over collections of data or doing repetitive tasks. Examples of loop constructs include “for”, “while”, and “do-while”.
- Functions: Blocks of code that do one thing. Functions break up programs into smaller pieces, making them more readable and less redundant.
You can see that the MQL4 coding environment is designed to accommodate several syntax features, providing the programmer with a suitable environment in which to develop robust forex trading bots and indicators.
2. Start With Declaration and Initializations
Variables are the basic building blocks of your code. But to use a variable, you must create it first. This action of the creation of a variable is called a declaration. So you will see the terms “create” or “declare” used interchangeably. However, the more industry-friendly term is the declaration. Declaring the variable tells the code to create the variable by assigning a data type to it.
To declare a variable,
- write the data type, followed by a space
- write the variable’s name.
- close the line using a semicolon (;).
See how the variable with the integer (int) data type is declared:
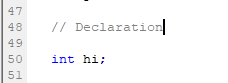
- Here, the data type is int for integer.
- Variable name is hi
- The line is closed with a semi-colon.
Variables are defined using various data types (such as int for integers or double for floating-point numbers), followed by a name for the variable (identifier). To create a variable, you have to define its data type. Common data types include:
- Integer (int): the integer represents any number that ranges from -2 billion to + 2 billion. The int data types cannot store decimals.
- Double: represents numbers that range from -1.79 X 10308 to +1.79 X 10308. You can store data with decimal points using the double data type.
- Boolean (Bool): This represents data that defines true or false or logic.
- Color: This stores the color.
- String: a string is a line of text.
- DateTime: stores data and time.
For example, you may see variables x, y, and z with integers 10, 7, and 5. You can decide to define a new piece of information for a variable a. You can, therefore, say that a = y + z. Since the values of y and z are already known, it follows that a = 12.
For example, to declare an integer variable called “myVar,” you would use the following syntax:
int myVarYou can also assign a value to a variable at the time of declaration. Let us assume we want the assigned value to be 12. We will use the following syntax to declare this assigned value for the myVar integer variable.
int myVar = 10;After declaring a variable, it can be used in the MQL code to perform a variety of functions or to fulfill its normal duty of storing information. So, if you are to add the code of the definition of the new variable a, as a summation of integer y + z, you can input it in this format:
int var1 = 10;
int var2 = 7;
Int var3 = 5

int result = var2 + var3; // result = 12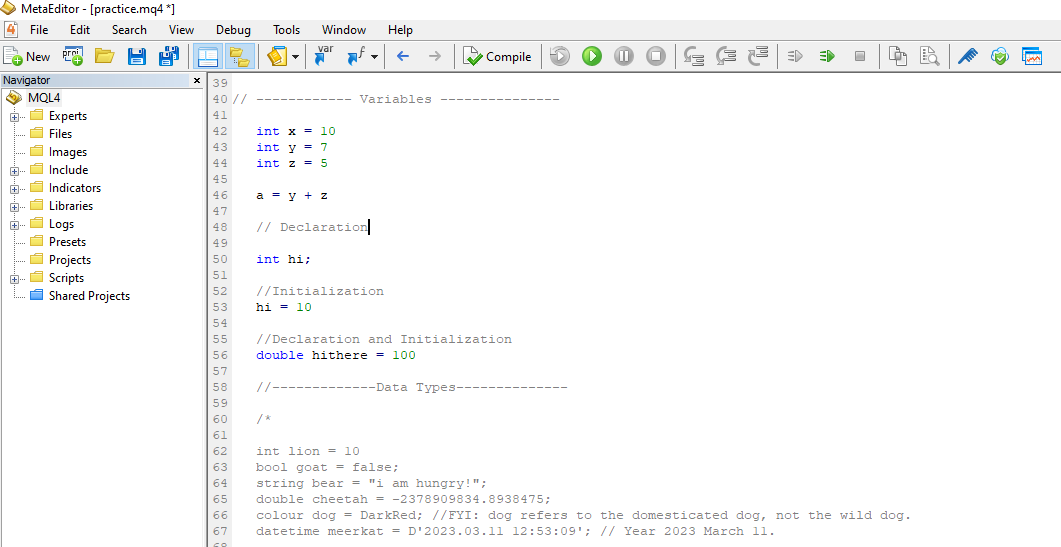
In this instance, you have declared three integer variables, known as var1, var2, and var3 (or x, y, and z). They have been assigned values of 10, 7, and 5, respectively. You are only interested in adding var2 and var3 to get a new integer for a new variable a. You use the + sign as the operator, and the int result is the new variable for a. The result value would be 12, which is the value obtained by adding var2 and var3.
For the purpose of core trading, a practical function for declaring/creating Variables is to store values that are amenable to change over time, such as the price of an asset. Currency prices change with time, so you can use a Variable to store and update this information whenever there is a tick change.
double price;

price = SymbolInfoDouble(_Symbol, SYMBOL_BID); // get the current bid price

ol, SYMBOL_BID); // get the current bid price
In a highly dynamic market like the FX market, you need to incorporate Variables in the code for your forex trading robot’s strategy to reflect this dynamism and adapt to changing market fundamentals.
3. Expressions
Operations bear similarities to arithmetical operations such as plus, minus, multiplications and divisions. These are referred to as operation symbols or operators. When combined with variables in the same code line, they form expressions.
Here are the commonly used operation symbols in MQL4 code.
a) Arithmetic operators: plus, minus, percentage, division, multiplication (+ – % / *)
b) Logical operators: && ||
c) Assignment operators: Equal, plus equal, and multiplication equal (= += *=)
Expressions with a semi-colon (;) that ends the code line is an operator. So what expressions are of value to an MQL4 programmer?
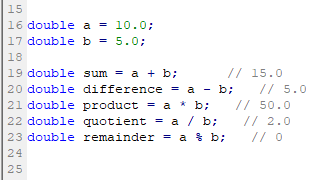
Arithmetic operators are used to perform mathematical calculations on numerical values. Here is what the arithmetic operators look like.

The ++ operator tells the code to increase the value of b in line 27 by 1, so if b = 70, the code will assign a value of 70 + 1 or 71 whenever b++ appears. Similarly, the – – operator tells the code to reduce the value of b in line 28 by 1, so the code will assign a value of 69 when bb- – appears.
Here is another example of the expression of an arithmetic operator:
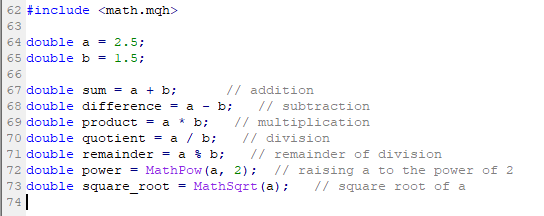
The ‘#include <math.mqh>’ directive instructs the code to enable the Math library functions to be used so there is no error when the code is compiled. The Math library functions seen here are MathPow() and MathSqrt().
So, what do each of the arithmetic operators mean?
- Addition (+): used to add the numerical values located to the left and right of the operator.
- Subtraction (-): used to subtract the numerical value on the right side of the operator from the numerical value on the left side of the operator
- Multiplication (*): used to multiply the values on the left and right sides of the operator.
- Division (/): used to divide the numeric value on the left of the operator by the numeric value on the right side of the operator.
- Modulus (%): returns the remainder of the division of the value on the left of the operator by the value on the right.
This is how they look in the MQL4 coding environment.
10 can be divided by 5 exactly two times with no remainder, so 10 % 5 will be 0 in line 23.
Assignment operators are used to give a value to a variable. Here is the meaning of the various assignment operators (= += -= *=)
- Assignment (=): assigns the value on the operator’s right side to the variable on the operator’s left.
- Addition assignment (+=): adds the value on the operator’s right to the variable’s value on the left, then assigns the result of this addition to the variable on the left to give it a new value.
- Subtraction assignment (-=): subtracts the value on the operator’s right from the variable’s value on the left, then assigns the result of this subtraction to the variable on the left to give it a new value.
- Multiplication assignment (*=): multiplies the value on the operator’s right by the variable’s value on the left side, then assigns the result of this multiplication to the variable on the left to give it a new value.
- Division assignment (/=): divides the value of the variable on the left by the value on the right side of the operator, then assigns the result to the variable on the left.
- Modulus assignment (%=): calculates the modulus of the value of the variable on the left and the value on the right of the operator, and assigns the result to the variable on the left.
Here are some examples of how the assignment operators can be used in MQL4:

4. Conditional operators (if/else, switch)
Conditional operators are used to perform functions that depend on whether another function’s parameters have been met. So, a conditional operator allows us to perform an action if another action is true.
In MT4, the conditional operators are the “if-else” and “switch” statements. They are both used to regulate how codes based on conditions are executed.
If-else statement
The “if-else” statement is typically used if multiple conditions in the code have to be checked,
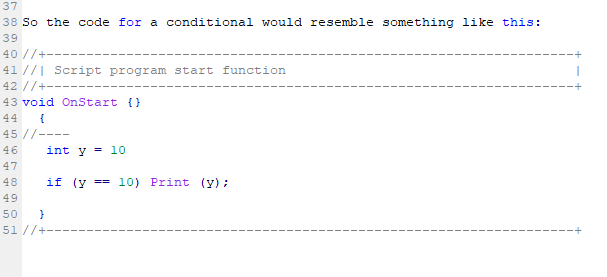
If this script is compiled and run, it will print 10 because the condition is true. If you need to execute this condition multiple times in the code, you can change the brackets to curly brackets.
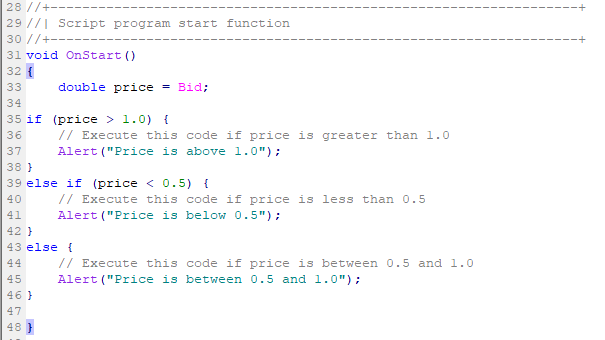
In the environment of the markets, the if-else statement is used in determining how the code works out the price variables.
Here is a sample of how the if-else condition works. Here, the variable “price” takes the value of the market ask price by default. The “if” component of the statement checks if the price is greater than 1.0. If yes, only the code within the first curly brackets will be executed. If not, (i.e. price < or = 1.), the only code which will run is the one within the second curly brackets.
//+--------------------------------------------------------+
//| Script program start function                          |
//+--------------------------------------------------------+
void OnStart(){
    double price = Bid;
    if (price > 1.0) {
        // Execute this code if price is greater than 1.0
        Alert("Price is above 1.0");
    }else if (price < 0.5) {
        // Execute this code if price is less than 0.5
        Alert("Price is below 0.5");
    }else {
        // Execute this code if price is between 0.5 and 1.0
        Alert("Price is between 0.5 and 1.0");
    }
}
You can also create another “if-else” statement within an existing if-else statement, i.e. within the curly brackets of either the existing “if” or “else” blocks. This is called a nested if-else statement. A sample is shown below:
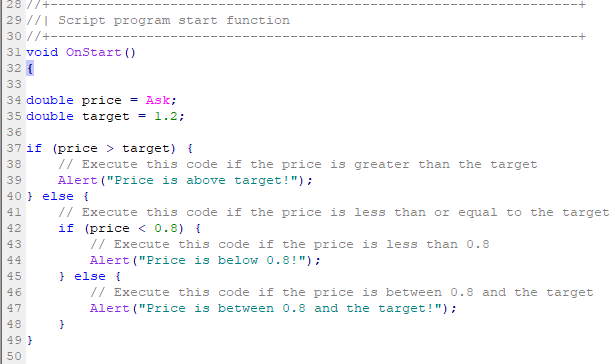
The nested if-else statement asks the code to check if the price is < 0.8 or lies between 0.8 and the target. If the price lies below 0.8, the code within the nested if statement runs. If no, the else statement of the nested code will run.
Conditional operators can be deployed in trade situations to handle pending entry orders and exit orders. These are the Buy Limit/ Sell Limit orders, Buy Stop/Sell Stop orders, and Take Profit/Stop Loss orders. If you notice, these are orders that can only be executed if certain price parameters are met (a condition). If the conditions are not met, they are not executed. Here is how the code for the trade entry conditionals would be written in the MQL4 environment.
Buy Stop
To place a buy-stop order at a specific price level, the following code can be used; The code asks the forex trading robot to do the following:
– execute a BUY STOP order at a stop distance of 10 pips from the current price, with a limit distance of 20 pips.
– use a Standard Lot (1.0 lots) as trade size.
– apply a green line to the order entry price on the chart for easy visualization.
– assign a unique identifier number to this trade.
//+------------------------------------------------------------------+
//| Expert tick function                                           |
//+------------------------------------------------------------------+
void OnTick()
{
    //---
    double StopDistance = 10.0;     // Stop distance in pips
    double LimitDistance = 20.0;    // Limit distance in pips
    double Lots = 1.0;              // Lot size
    int Slippage = 3;               // Maximum price deviation
    int MagicNumber = 12345;        // Unique identifier
    color Green = Lime;             // Order line color

    // Get the current ask price
    double price = Ask;

    // Calculate the stop and limit prices
    double stopPrice = NormalizeDouble(price + StopDistance * Point, Digits);
    double limitPrice = NormalizeDouble(price + LimitDistance * Point, Digits);

    // Place the buy stop order
    int ticket = OrderSend(Symbol(), OP_BUYSTOP, Lots, stopPrice, Slippage, limitPrice, 0, "", MagicNumber, 0, Green);

    if(ticket > 0)
    {
        Print("Buy stop order placed successfully with ticket #", ticket);
    }
    else
    {
        Print("Error placing buy stop order. Error code:", GetLastError());
    }
}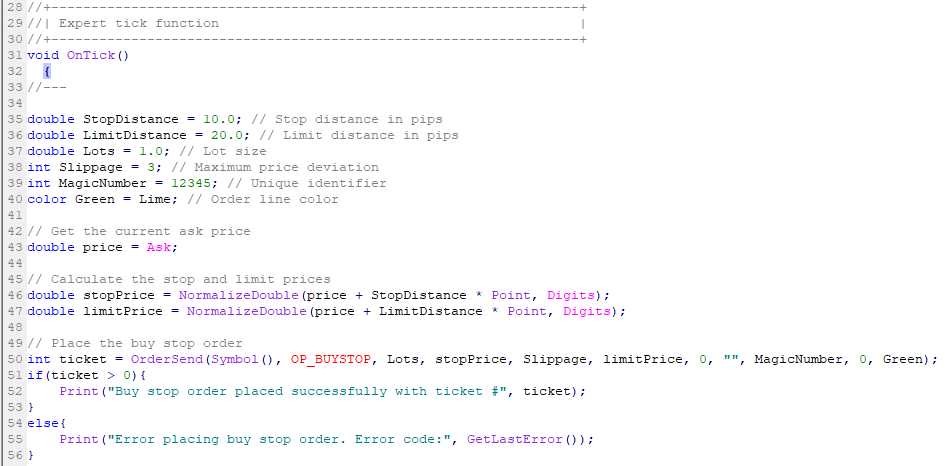
The code defines the following variables:
- StopDistance
- LimitDistance
- Lots
- Slippage
- MagicNumber
- Green
Once the order is placed, the code will check for successful execution using the OrderSend() function’s return value (ticket). If the Buy Stop order is successfully filled, the code will print a message to the MT4 Journal tab. If not, the code will print an error message with the error code.
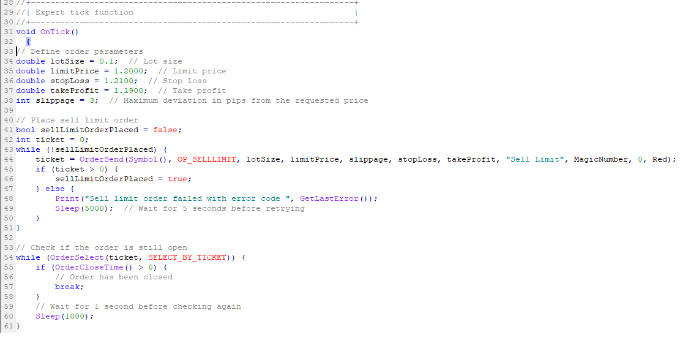
Sell Limit
To place a sell limit order at a specific price level, the following code can be used:
// Define order parameters

double lotSize = 0.1;  // Lot size
double limitPrice = 1.2000;  // Limit price
double stopLoss = 1.2100;  // Stop loss
double takeProfit = 1.1900;  // Take profit
int slippage = 3;  // Maximum deviation in pips from the requested price

// Place sell limit order
bool sellLimitOrderPlaced = false;
int ticket = 0;

while (!sellLimitOrderPlaced) {
      ticket = OrderSend(Symbol(), OP_SELLLIMIT, lotSize, limitPrice, slippage, stopLoss, takeProfit, "Sell Limit", MagicNumber, 0, Red);
      if (ticket > 0) {
         sellLimitOrderPlaced = true;
      } else {
         Print("Sell limit order failed with error code ", GetLastError());
         Sleep(5000);  // Wait for 5 seconds before retrying
      }
}

// Check if the order is still open
while (OrderSelect(ticket, SELECT_BY_TICKET)){
      if (OrderCloseTime() > 0) {
         // Order has been closed
         break;
      }

      // Wait for 1 second before checking again
      Sleep(1000);
}
Stop Loss
This is how the forex trading robot would be asked to set a stop loss for a trade. Setting the stop loss can be tricky. Some programmers would want the code to set the stop loss only when the order is active. In this case, the code would be to modify the stop loss.
In this code, the EA has been asked to create a pending order and then modify the stop loss when the order has been executed.
// Define order parameters
double lotSize = 0.1;  // Lot size
double limitPrice = 1.2000;  // Limit price
double stopLoss = 1.2100;  // Stop loss
double takeProfit = 1.1900;  // Take profit

// Place the pending order
int ticket = OrderSend(Symbol(), OP_SELLLIMIT, lotSize, limitPrice, 0, stopLoss, takeProfit, "Sell Limit", MagicNumber, 0, Red);
if (ticket <= 0) {
    Print("Failed to place pending order with error code ", GetLastError());
} else {
    Print("Pending order placed with ticket number ", ticket);
}

// Modify the stop loss for the pending order
if (OrderSelect(ticket, SELECT_BY_TICKET, MODE_TRADES)) {
    double newStopLoss = 1.2050;  // New stop loss value
    if (!OrderModify(ticket, OrderOpenPrice(), newStopLoss, OrderTakeProfit(), 0, Green)) {
        Print("Failed to set stop loss for pending order with error code ", GetLastError());
    } else {
        Print("Stop loss set for pending order with ticket number ", ticket);
    }
} else {
    Print("Failed to select pending order with ticket number ", ticket, " with error code ", GetLastError());
}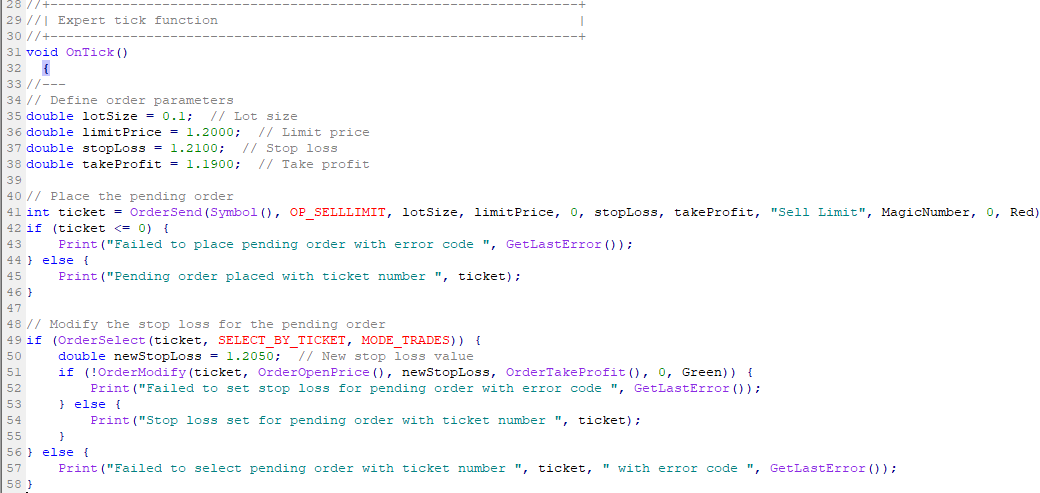
The variables in the code are seen clearly:
- the lot size is 1 mini lot (0.1 lots)
- The limit price is 1.2000
- Stop loss is 1.2100
- The take profit is 1.1900
The code has also asked to print any error codes to the journal if the stop loss cannot be modified. The pending order is placed using the OrderSend function, using the variables above as the desired parameters.
If the order goes through, the code asks the Forex trading robot to use the OrderSelect function (which contains the ticket number for identification). The MODE_TRADES function asks the robot to select open and pending orders for this action.
You can also use the OrderModify function to change order parameters, and the newStopLoss function to change the stop loss.
Please note you must know the rules regarding how many times you can change these parameters with your broker when you set the variables.
Take Profit
You may also decide to set a Take Profit order using a different code if you do not set it along with the stop loss as shown above. You can use the following code:
void OnTick()  {

// Set take profit level
double takeProfit = 1.5; // Take profit level as a multiple of the trade's open price
double stopLoss = 1.0; // Stop loss level as a multiple of the trade's open price

// Place trade with take profit and stop loss levels
int ticket = OrderSend(Symbol(), OP_BUY, 1.0, Ask, 3, Bid - stopLoss * Point, Bid + takeProfit * Point, "My Order", MagicNumber, 0, Blue);
}
This code has opted to use a risk-reward setting of 1:1.5 to set both the stop loss and take profit price targets. So the TP here is 1.5 times the entry price. Again, the OrderSend function places the trade, and the stopLoss and takeProfit variables are defined.
Switch
while the “switch” statement is used when there are multiple possible values for a variable to be compared against. Here is an example of how to use the “if-else” and “switch” statements in MT4:
double price = Bid;
int tradeType = 2; // 0 = buy, 1 = sell, 2 = do nothing

// if-else statement
if (price > 1.0) {
    tradeType = 0;
}else if (price < 0.5) {
    tradeType = 1;
}

// switch statement
switch (tradeType) {
    case 0:
        // Execute this code if tradeType is 0 (buy)
        OrderSend(Symbol(), OP_BUY, 0.1, price, 0, 0, 0, "Buy order", 0, 0, Green);
        break;
    case 1:
        // Execute this code if tradeType is 1 (sell)
        OrderSend(Symbol(), OP_SELL, 0.1, price, 0, 0, 0, "Sell order", 0, 0, Red);
        break;
    default:
        // Execute this code if tradeType is not 0 or 1 (do nothing)
        break;
}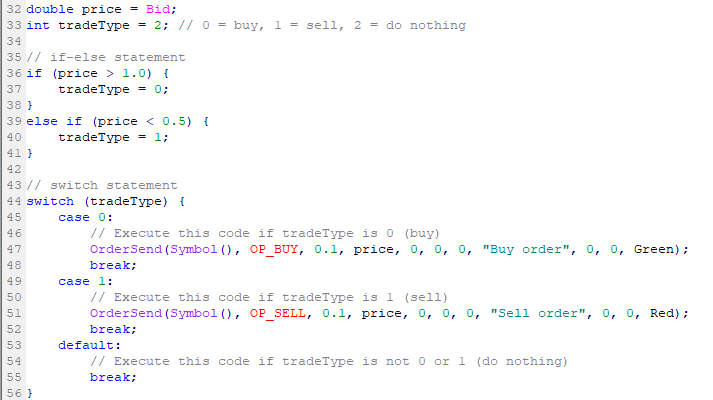
The if/else statement requires the code to check and execute from the price standpoint.
- If the price > 1.0, the tradeType variable = 0 -> BUY.
- If the price variable < 0.5, the tradeType variable = 1 -> SELL.
- If the price is at current bid price (default setting), tradeType = 2 -> NO ACTION.
When using the switch statement, things are a bit different. The code will focus attention on the tradeType variable.
- If the tradeType = 0, -> BUY at price level set in the code.
- If the tradeType = 1, -> SELL at price
- If the tradeType = 2, -> NO ACTION
Follow these guides to learn how to install your forex robot on your trading terminals:
How to Install a Forex Trading Bot in MT4
How to Install a Forex Trading Bot in MT5
Conclusion
In conclusion, this piece has looked at the different types of resources that make up the typical code of a Forex robot and the development of automated trading systems. You have been shown the types of code that can be done in MQL4 (forex trading bot, indicators, and scripts) and the various code formats that form components of the code of a forex robot. We have also looked at the various forms of code required for a Forex robot, indicator, and script within the MQL4 environment. You now must have some idea about comments and identifiers, which are components of the coding syntax.
The core content of this module requires a lot of work and practice to perfect. We hope that the information here has helped you understand what goes into the coding of a Forex robot.